Hi all. Today I will share with you the steps to migrate the AD FS configuration database from WID to SQL server using the SQL Server Management Studio (SSMS). These instructions will help Windows admins planning to migrate to SQL databases in order to be able to escalate more than 100 Relying Party Trusts, have more than 30 AD FS servers and other improvements that are described in this document.
The AD FS configuration database stores all configuration data that represents a single AD FS instance or Federation Service. This configuration data can be stored in either a SQL Server database or using the Windows Internal Database feature included with Windows Server since 2008 to 2019.
Requirements to run the migration
- At least one SQL Server or SQL service with High availability. We are using Windows server version 2019 with SQL Service.
- One AD FS server as primary or more than one for High availability. We are running AD FS on a Windows server 2019 version.
- SSMS installed in both AD FS and SQL servers. We are using SSMS version 18.8.
Starting the migration
To start the migration, follow steps below on AD FS server:
Download SSMS latest version – https://aka.ms/ssms

Install SSMS tool in your currently Primary ADFS Server.
Check the current Database Connection String and Name by running the PowerShell cmdlet below:
Get-WmiObject -namespace root/ADFS -class SecurityTokenService
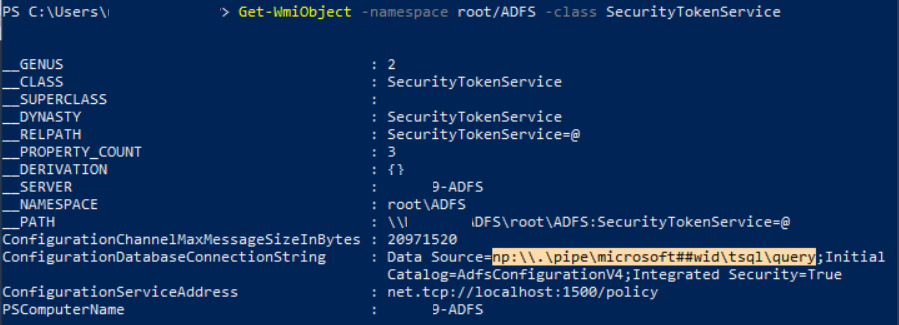
Take the highlighted connection string shown in the ConfigurationDatabaseConnectionString parameter above.
Run command below to stop AD FS Service:
net stop adfssrv

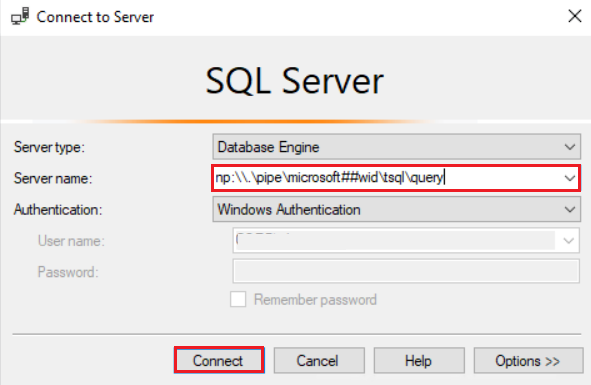
Open SSMS and connect to the instance below taken from previous step:

Click Connect.
After connecting to the WID database, we’ll see both AD FS configuration databases to be migrated as below:
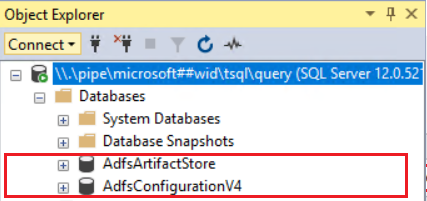
Note: Depending on the AD FS farm behavior level, you might see a different AD FS configuration Database name as below:
| Windows Server Version | FBL | AD FS Configuration Database Name |
|---|---|---|
| 2012 R2 | 1 | AdfsConfiguration |
| 2016 | 3 | AdfsConfigurationV3 |
| 2019 | 4 | AdfsConfigurationV4 |
Detaching de WID databases
Let’s detach the databases from WID via query: 1-Right-click the Database’s connection and 2-Select New Query.
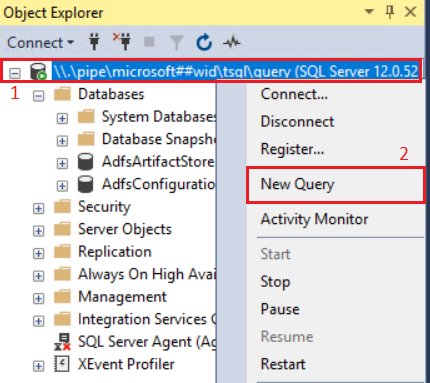
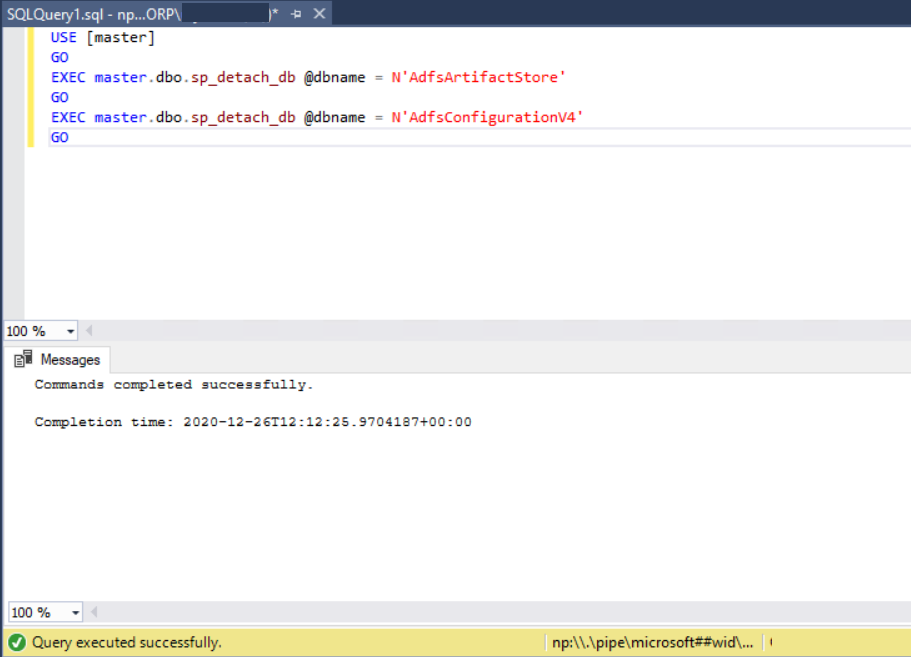
Use the below SQL Commands in the Query option:
USE [master]
GO
EXEC master.dbo.sp_detach_db @dbname = N'AdfsArtifactStore'
GO
EXEC master.dbo.sp_detach_db @dbname = N'AdfsConfigurationV4'
GO
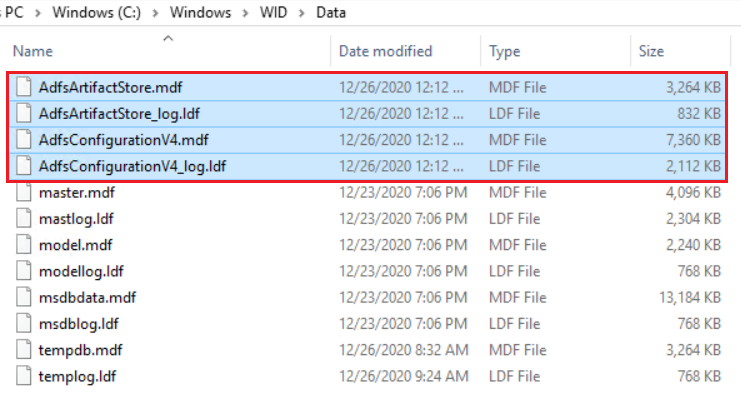
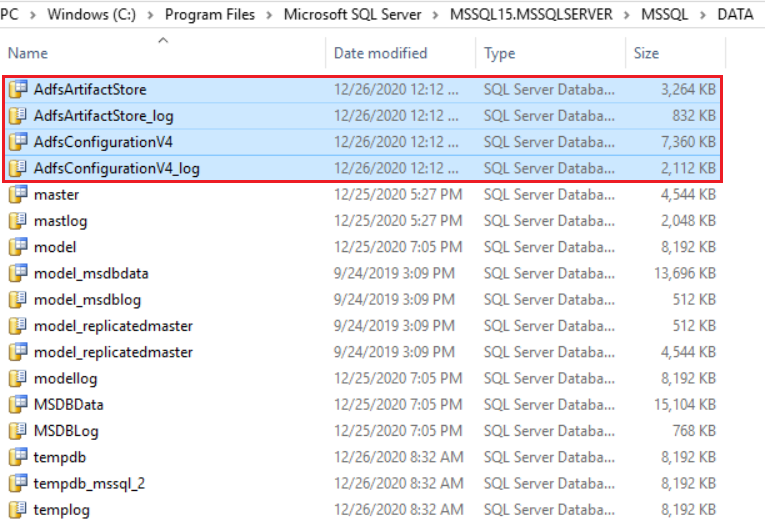
Copy the Database files below from “C:\Windows\WID\Data” folder to the desired directory on the Destination SQL Server. In our SQL server, the destination will be “C:\Program Files\Microsoft SQL Server\MSSQL15.MSSQLSERVER\MSSQL\DATA”.
C:\Windows\WID\Data\AdfsConfigurationV4.mdf
C:\Windows\WID\Data\AdfsConfigurationV4_log.ldf
C:\Windows\WID\Data\AdfsArtifactStore.mdf
C:\Windows\WID\Data\AdfsArtifactStore.ldf
Source (AD FS server):
Destination (SQL Server):
In the SQL server, follow the instructions below to attach the copied databases:
In SQL Server, open SSMS and connect to the default database:
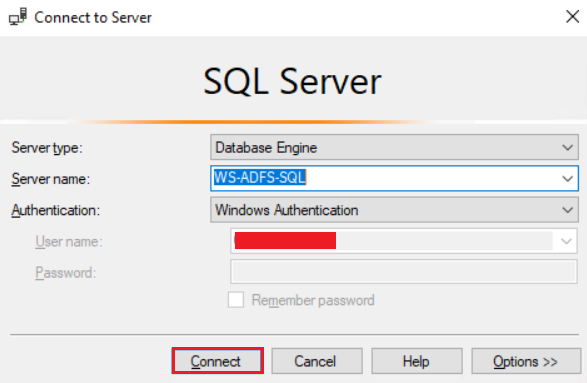
Attach the Databases to the Destination SQL Server using a new Query with commands below:
GO
CREATE DATABASE [AdfsConfigurationV4] ON
( FILENAME = N'C:\Program Files\Microsoft SQL Server\MSSQL15.MSSQLSERVER\MSSQL\DATA\AdfsConfigurationV4.mdf' ),
( FILENAME = N'C:\Program Files\Microsoft SQL Server\MSSQL15.MSSQLSERVER\MSSQL\DATA\AdfsConfigurationV4_log.ldf' )
  FOR ATTACH
GO
USE [master]
GO
CREATE DATABASE [AdfsArtifactStore] ON
( FILENAME = N'C:\Program Files\Microsoft SQL Server\MSSQL15.MSSQLSERVER\MSSQL\DATA\AdfsArtifactStore.mdf' ),
( FILENAME = N'C:\Program Files\Microsoft SQL Server\MSSQL15.MSSQLSERVER\MSSQL\DATA\AdfsArtifactStore_log.ldf' )
  FOR ATTACH
GO
ALTER DATABASE AdfsConfigurationV4 set enable_broker with rollback immediate
GO
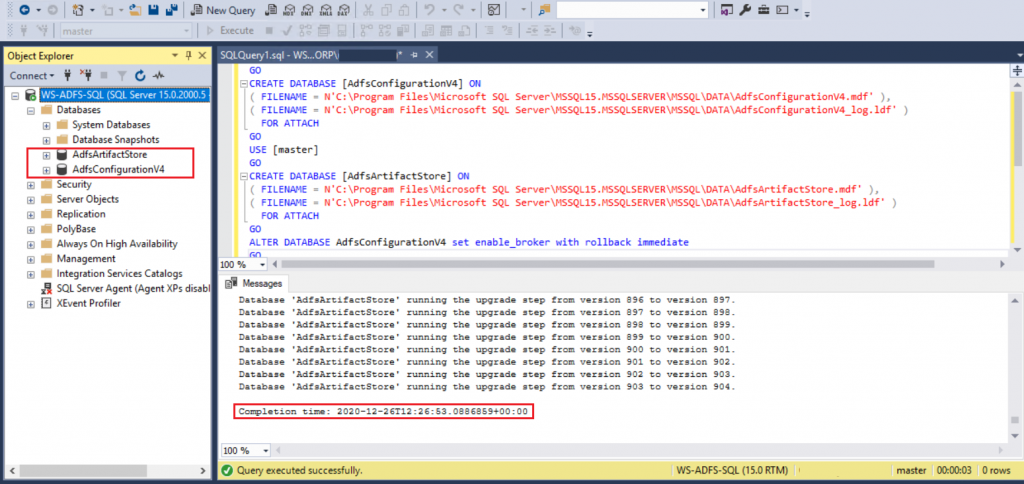
After running the query, we see the AD FS configuration databases and the successful query’s result as below:
Configure AD FS Account’s permission in the SQL service
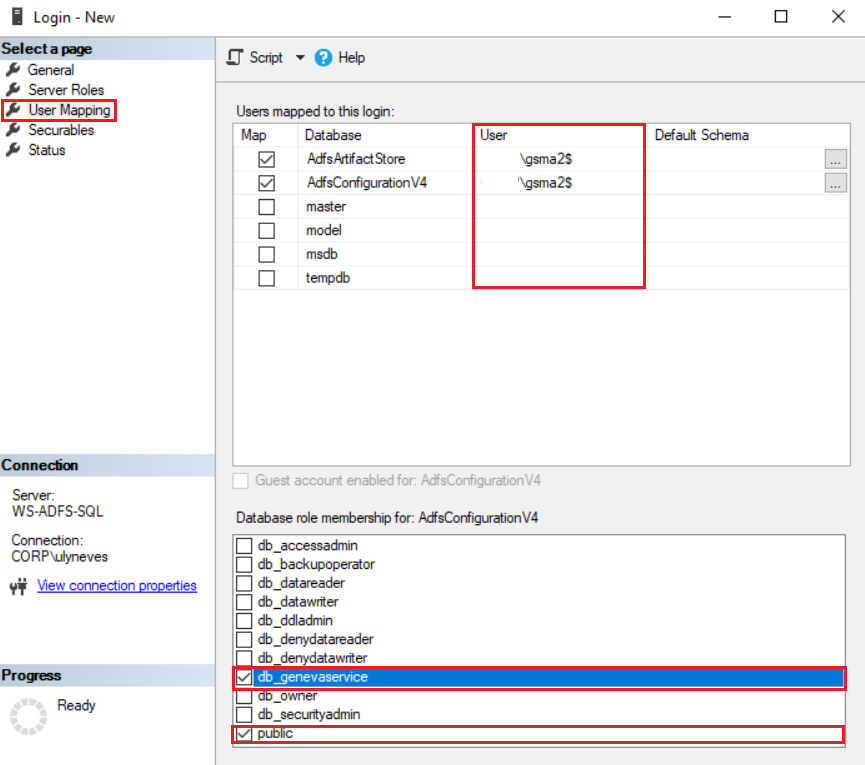
In order to have the appropriate permissions in the new server, the AD FS service account must have at least a public login and the db_genevaservice roles into SQL to access both databases.
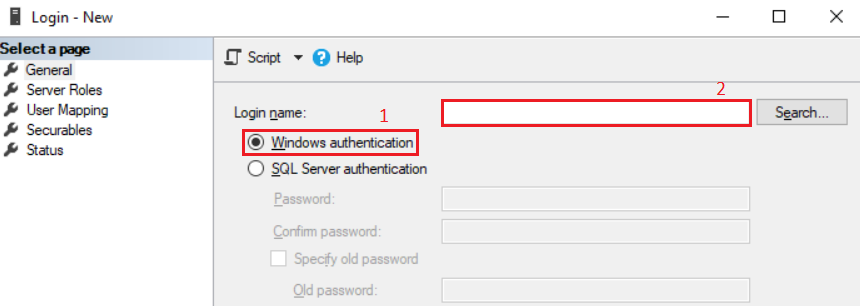
To validate the permissions in SSMS, go to Security > Logins. If you don’t see the AD FS service account, right-click on Logins and select New login
1 – Keep selected Windows authentication.
2 – Type the AD FS service account in the Login name’s Box.
In case you don’t know which account is used by AD FS service, in the AD FS server, run command below:
Get-ItemProperty -Path HKLM:\SYSTEM\CURRENTCONTROLSET\SERVICES\ADFSSRV | Select ObjectName
After configuring the AD FS service account, make sure it has the correct roles selecting option User Mapping > Select the AD FS databases and check the roles:
Updating the main Database Connection string in AD FS Server
In AD FS server, check if the AD FS service is stopped. If not, stop the service and proceed to next step:
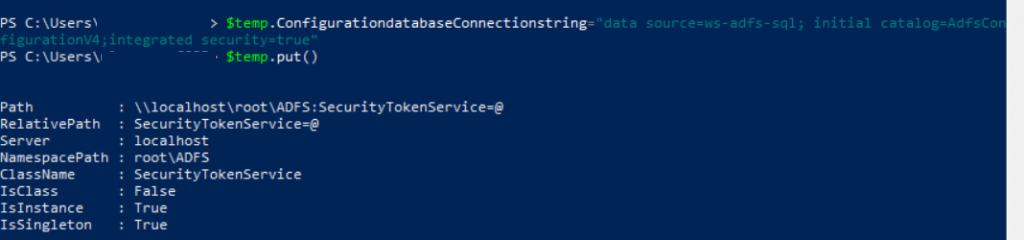
Run commands below to update the connection string:
Note: Customize the command according to your SQL server/instance.
$temp= Get-WmiObject -namespace root/ADFS -class SecurityTokenService
$temp.ConfigurationdatabaseConnectionstring="data source=<SQLCluster\SQLInstance>; initial catalog=AdfsConfigurationV4;integrated security=true"
$temp.put()
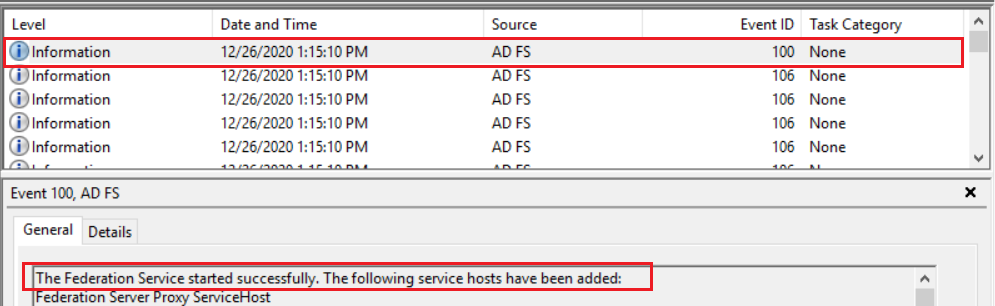
Start AD FS Service and check if you have Event ID 100 into Event Viewer > Applications and Service Logs > AD FS > Admin.
Updating the AdfsArtifactStore Database Connection string for Primary ADFS Server
Now let’s configure the connection string for database AdfsArtifactStore running command below:
Note: Customize the command according to your SQL server/instance.
Set-AdfsProperties –artifactdbconnection "Data source=<SQLCluster\SQLInstance>;Initial Catalog=AdfsArtifactStore;Integrated Security=True"
Restart AD FS service running command Restart-Service adfssrv.

In case you have Secondary ADFS Servers
In this lab I don’t have a secondary AD FS server but in case you have, follow instructions below in all secondary AD FS servers:
Stop ADFS Service with PowerShell using command Stop-Service adfssrv and run commands below to update the connection string:
$temp= Get-WmiObject -namespace root/ADFS -class SecurityTokenService
$temp.ConfigurationdatabaseConnectionstring="data source=<SQLCluster\SQLInstance>; initial catalog=AdfsConfigurationV4;integrated security=true"
$temp.put()
Start AD FS service with command Start-Service adfssrv and check if event ID 100 shows up in the AD FS Admin logs.
Note: After moving successfully to SQL Database, in case you have more than one AD FS server, all AD FS servers in the farm become primary.
Summary
In this article, we covered how to migrate your AD FS configuration database from WID to SQL using SSMS.
I hope you have enjoyed reading this article and it helps you when administering your AD FS environment.
Enjoyed the article? Like and share. 🙂
Note: I do not represent the organization I work for, all the opinions expressed here, are my own. This post is provided AS IS with no warranties or guarantees and confers no rights.
In case you have any suggestions or feedback, please leave a comment.
[ ]’s
Ulysses Neves

Wow, thanks so much. I had MS support to help me with this and paid 5 hours of support and they can’t even get it done but your instruction is so great that I went through the ADFS database migration from WID to SQL just only once.
Thanks so much!
Nice to be able to help! 🙂
Remember, I do not represent the organization I work for, all the opinions and steps expressed here, are my own. This post is provided AS IS with no warranties or guarantees and confers no rights.
This will definitely come in handy. Thank YOU for taking the time to publish this instructional.
Nice to be able to help and thank you for the feedback. 🙂