Hello, everyone. Continuing our series on Azure resource security, we’ll talk about the access control feature in Azure, Identity Access Management (IAM), and demonstrate how to grant access to resources in Azure using the portal as well as PowerShell.
What Is Identity Access Management (IAM)?
Azure access control, better known as IAM, has the same functions as RBAC (Role-based Access Control), but it controls access to resources, resource groups, and subscriptions in Azure. Having an account in Microsoft Entra ID does not guarantee access to the resources available on this platform. To access Azure resources, you need to use RBAC (IAM) to allow access to the services available in Azure for each user.
For the demonstration, let’s consider the scenario below:
Resource to be granted access: rg-iam-lab
Resource Owner: Sara
Resource Contributor: IT Group; John
Click the resource whose access will be configured, and select the Access control (IAM) option.
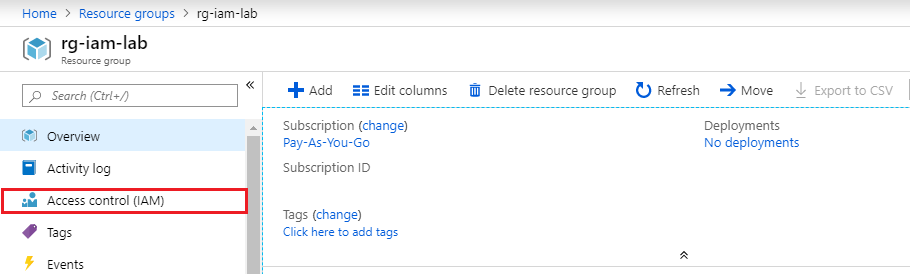
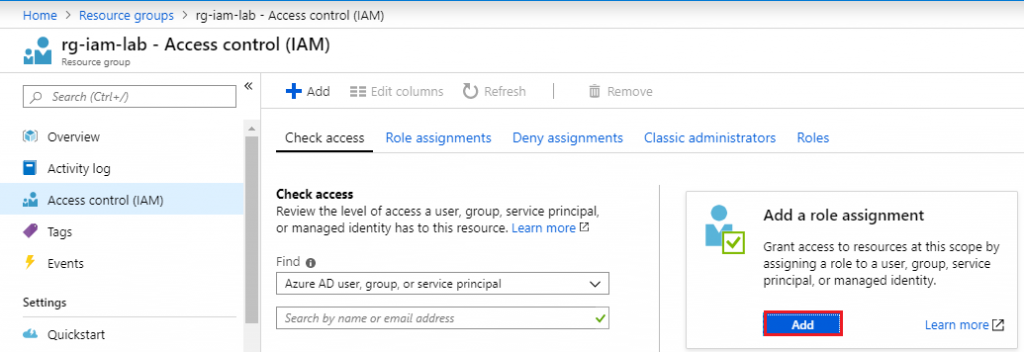
Click Add to configure access to the rg-iam-lab resource group.
In the IAM console, click Add in the “Add a role assignment” menu.
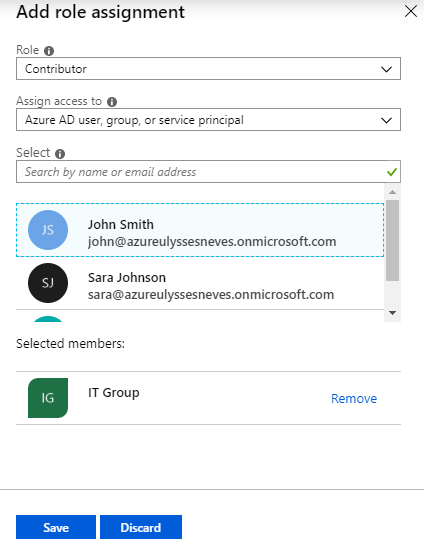
To illustrate access, let’s grant Owner access to the user Sara.
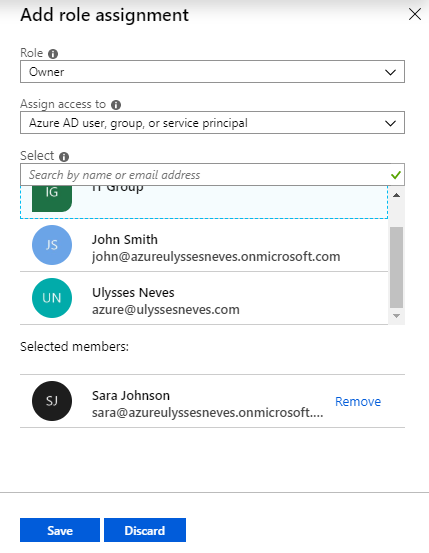
Let’s grant Contributor access to the “IT Group” group.
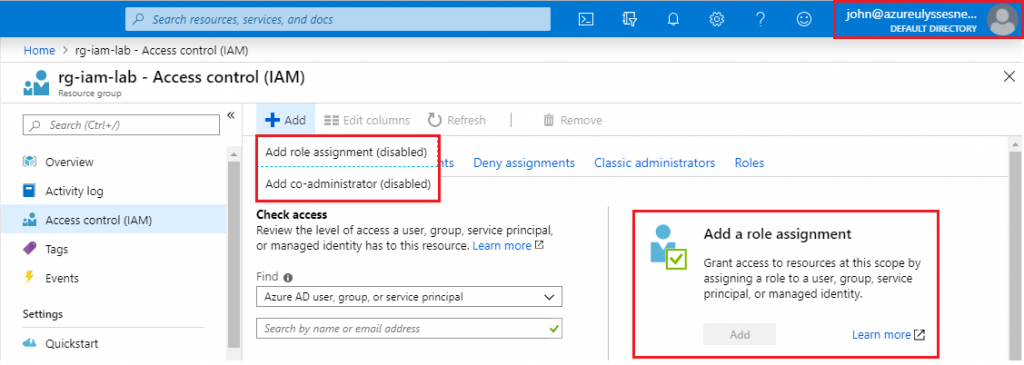
Note: basically, the difference between the Owner and Contributor roles is that the latter doesn’t have permission to edit permissions.
We access the Azure portal with the user John, to whom we assigned the “Contributor” role for the rg-iam-lab resource group. Note below that, without the “Owner” role, the functions for adding and configuring permissions are disabled.
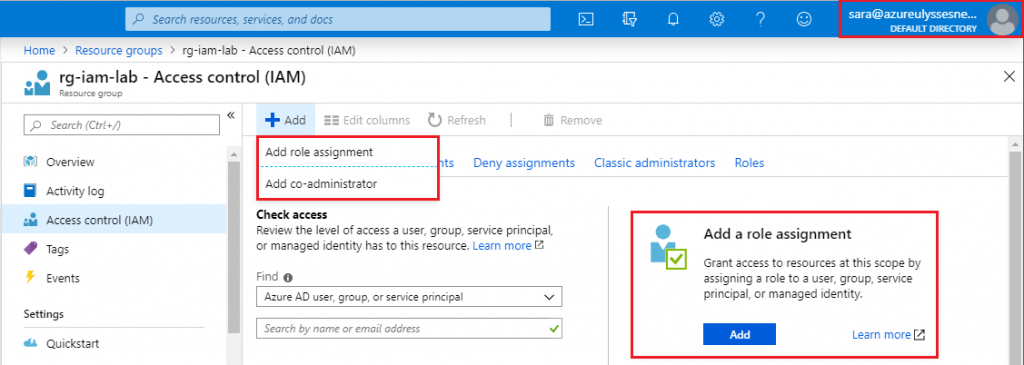
Now let’s check the options available for the user Sara, who has the “Owner” role on this Resource Group.
To better understand RBAC roles in Azure, access this link.
Controlling Access Using PowerShell
To demonstrate how to configure access using PowerShell, let’s consider the scenario below:
Resource to be granted access: rb-iam-lab-ps
Resource Owner: John
Resource Contributor: IT Group; Sara
Resource Reader: Fred
Open PowerShell and connect to Azure using the Connect-AzAccount command. If you haven’t yet configured the Azure module for PowerShell, access this post, where I show step by step how to configure it.
Let’s assign the “Owner” role to the user John by running the command:

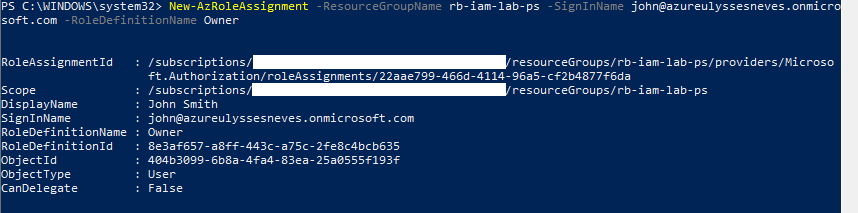
Syntax: New-AzRoleAssignment -ResourceGroupName resource name -SignInName user@domain -RoleDefinitionName role
You can also assign access using the -Objectid parameter of the user or group in Azure.
To identify a group’s Objectid, run the command below:


To identify a user’s Objectid, run the command below:


Now let’s set the “Contributor” permission for the IT Group group and “Reader” for the user Fred using the Objectid attribute. Run the command below to assign access to the IT Group group:

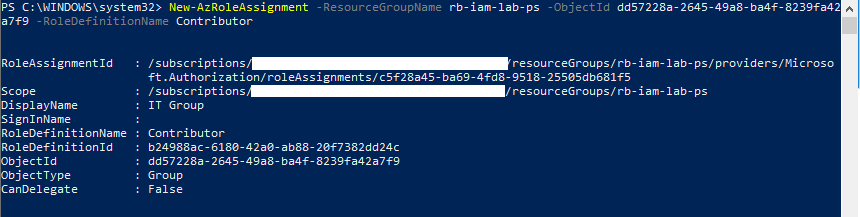
Now let’s add the “Reader” permission for the user Fred on the rb-iam-lab-ps resource group using the command:

Syntax: New-AzRoleAssignment -ResourceGroupName resource name – -ObjectId object ID attribute -RoleDefinitionName role
Viewing Current Permissions on a Resource in PowerShell
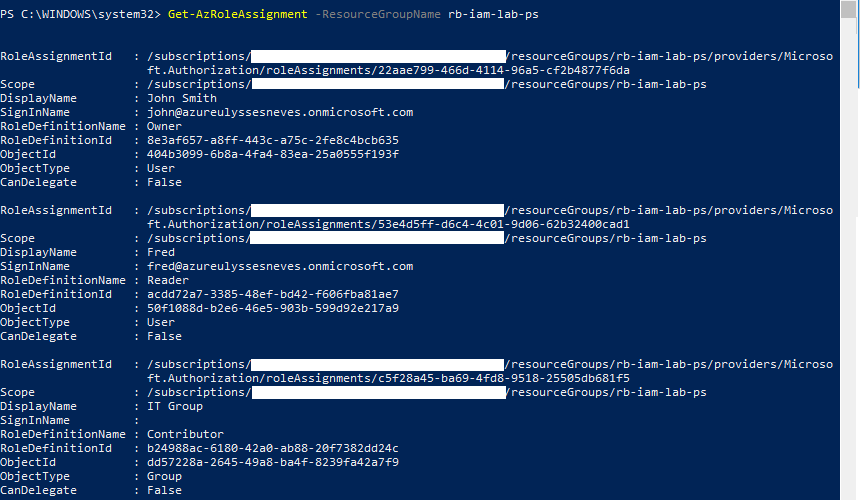
You can check which permissions are granted to a resource by running the command:

Removing Permissions from a Resource
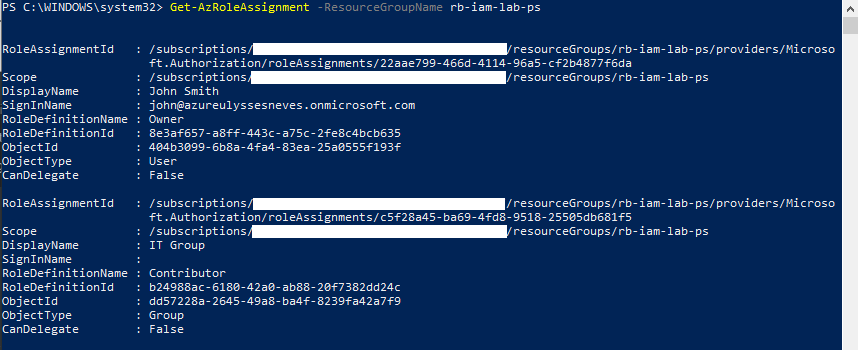
To illustrate how to delete a permission, let’s remove the “Read” access of the user Fred. To remove permissions from a resource, run the command:


By running the list command again, we can see that the user Fred no longer has permission on the resource group.
Controlling Access Using Azure CLI
Let’s configure the same access scenario as with PowerShell using Azure CLI commands, but in a new resource group called rb-iam-lab-acli, considering the permissions below:
Resource to be granted access: rb-iam-lab-acli
Resource Owner: John
Resource Contributor: IT Group; Sara
Resource Reader: Fred
To grant access to a resource in Azure using Azure CLI, let’s run the command below:

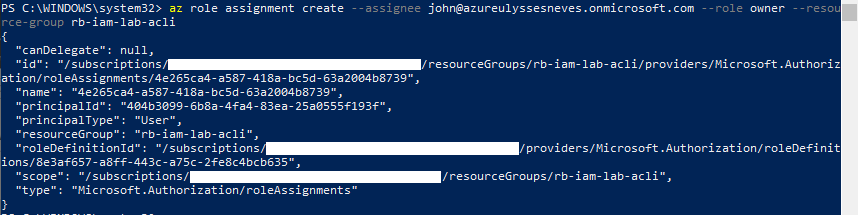
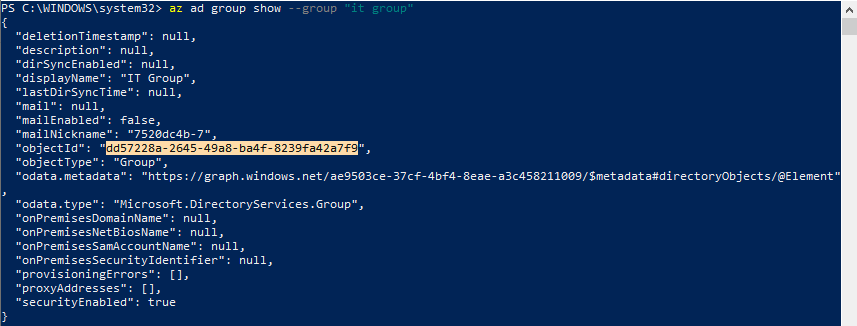
To assign the group permission, let’s identify the Objectid of the “IT Group” group using Azure CLI. Run the command:

Let’s copy the digits highlighted below to assign the access.
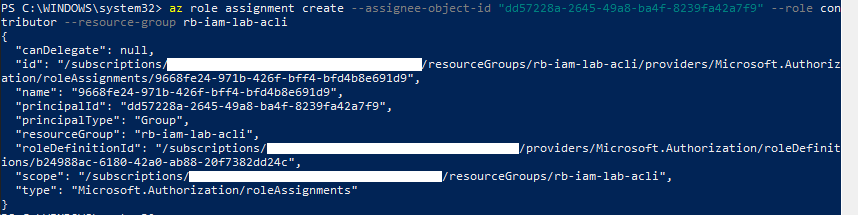
Now let’s assign the “Contributor” permission to the IT Group group using the command:

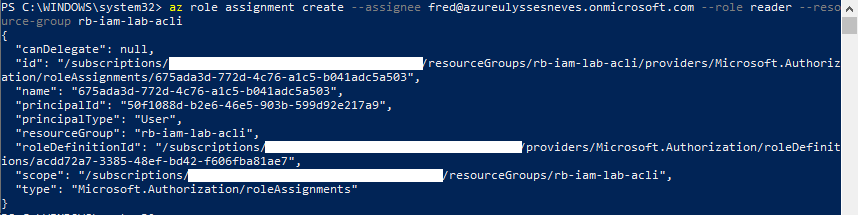
Let’s assign the user Fred “reader” access with the command:

For more information about how to create permissions on resources using Azure CLI, access this link.
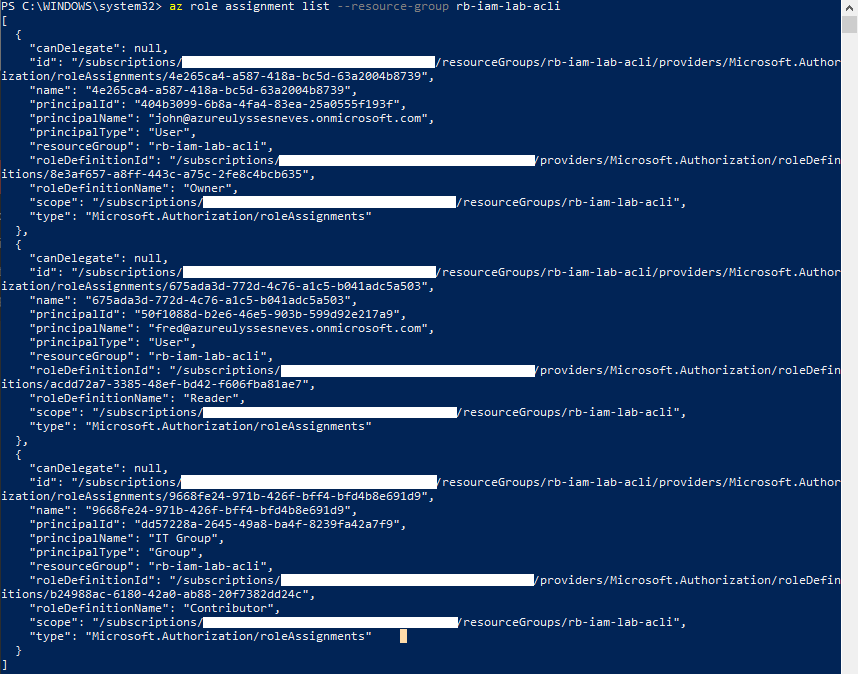
Viewing Current Permissions on a Resource
You can check which permissions are granted to a resource by running the command:

Removing Permissions from a Resource
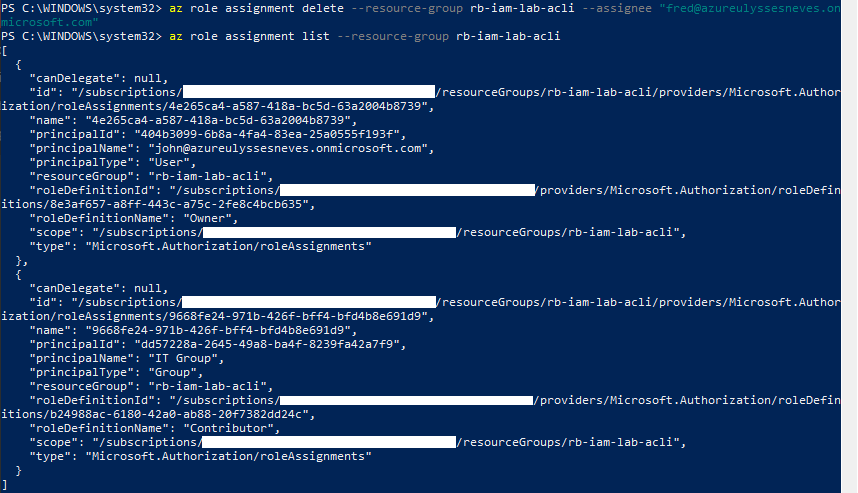
To illustrate how to delete a permission, let’s remove the “Read” access of the user Fred. To remove permissions from a resource, run the command:

By running the list command again, we can see that the user Fred no longer has permission on the resource group.
Summary
Well, everyone, in this post we covered quite a bit about controlling user and group access to a resource or resource group using Azure access control (IAM). We explained the concept and its application, and walked step by step through how to add, remove, and view access using the Azure portal, PowerShell, and Azure CLI.
In the next post, we’ll cover Azure Policy and how to apply it to resources to ensure the standardization of resources defined by the company.
I hope this content has contributed to enriching your knowledge of Azure.
Did you like the post? Like and share it.
If you have any suggestions or comments, leave a comment.
[ ]’s
Ulysses Neves
