
Configuring Entra Privileged Identity Management (PIM) with Conditional Access authentication context and Conditional Access authentication strength can significantly enhance your organization’s security posture. By requiring users to meet specific authentication requirements when activating roles in PIM, you can ensure that sensitive roles are only accessed under the most secure conditions.
Conditional Access authentication strength is a feature that allows you to define and enforce specific authentication methods, such as multifactor authentication (MFA) or passwordless authentication, based on the sensitivity of the roles being accessed. This ensures that only users who meet the highest security standards can activate privileged roles.
Benefits of integrating Conditional Access authentication strength with Entra PIM and Conditional Access authentication context include:
Enhanced Security: By requiring stronger authentication methods, such as phishing-resistant MFA or passwordless authentication, you reduce the risk of unauthorized access to sensitive roles.
Compliance: Enforcing specific authentication strengths helps meet regulatory and compliance requirements by ensuring that only authenticated and authorized users can access critical resources.
Improved User Experience: Users can benefit from a seamless and secure authentication process, reducing the need for frequent password changes and minimizing the risk of password-related security issues.
Granular Control: Administrators can create custom authentication strength policies tailored to the organization’s security needs, providing flexibility and control over access management.
This guide will walk you through the process of configuring Entra PIM activation using Conditional Access authentication context. We will cover each step in detail and indicate where you should place screenshots to aid in understanding.
Note: In this article, Passkeys will be used as the authentication strength method. If you want to use it, make sure you have enabled it in your tenant following this official Microsoft guide: Enable passkeys for your organization (preview) – Microsoft Entra ID | Microsoft Learn
Step 1: Set Up Authentication strength
- Access the Azure Portal
Log into the Azure Portal with your administrative credentials. - Navigate to Authentication strength
Select Microsoft Entra ID, and then select Security. Expand Protect and select Conditional Access. In the Manage section, click on Authentication strengths. - Click on New authentication strength.
- Enter a name and description for your authentication strength setting.
- Select Passkeys (FIDO2).
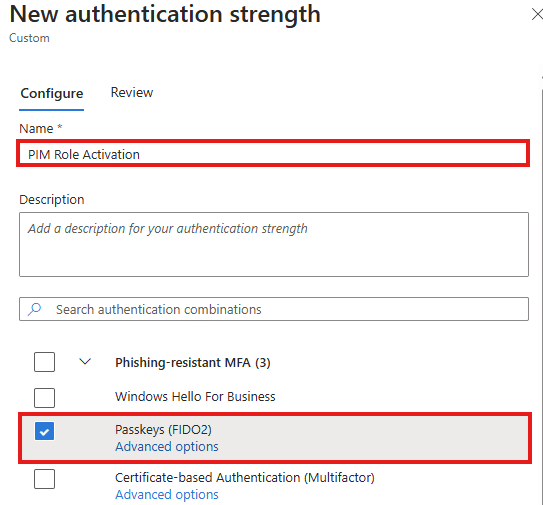
- Select Passkeys (FIDO2).
- Click on Advanced options.
- Select Microsoft Authenticator (Preview)
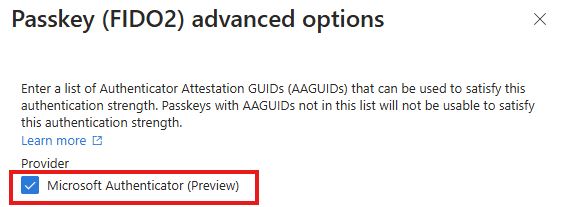
- Click Save.
- Click Next and Update.
Step 2: Set Up Authentication Context
- Access the Azure Portal
Log into the Azure Portal with your administrative credentials. - Navigate to Authentication contexts
Select Microsoft Entra ID, and then select Security. Expand Protect and select Conditional Access. In the Manage section, click on Authentication contexts. - Click on New authentication context.
- Enter a name and description for your authentication context.
- Check the Publish to apps checkbox.
- Click Save.

Step 3: Set Up Conditional Access Policy for Authentication Context
- Access the Azure Portal
Log into the Azure Portal with your administrative credentials. - Navigate to Conditional Access
Select Microsoft Entra ID, and then select Security. Expand Protect and select Conditional Access. - Create a New Conditional Access Policy
Select Create new policy at the top of the Conditional Access pane. Name your policy appropriately, e.g., “PIM Role Activation Context”.
- Assign Users and Groups
In the Assignments section, choose Users and groups and specify the users or groups that the policy will apply to. This will generally be the users who will activate PIM roles. In my case, I’m setting this to All users. Please make sure you add at least one account in the exclusion list.
- Select Target resources
In the Target resources section, choose Authentication Context, and add select the authentication context configuration created on step 1.
- Configure Conditions (Optional)
You may configure additional conditions such as device compliance, location, etc., depending on your organization’s security requirements.
- Configure Access Controls
Under Grant, choose Require authentication strength and select the authentication context you created in step 2. In my case, I’ve configured Phishing-resistant MFA methods.
Note: Mandating strong authentication for PIM group membership allows the use of advanced methods like phishing-resistant MFA and Passwordless MFA, providing enhanced security compared to basic MFA methods like SMS.
- Enable the Policy
Toggle Enable policy to On, then click Create to save the policy.
Step 4: Configure PIM to Use Conditional Access Authentication Context
- Navigate to Privileged Identity Management (PIM)
From the Azure Portal, go to Microsoft Entra ID > Identity Governance > Privileged Identity Management. - Select the Role to Configure
Under Manage, select Microsoft Entra roles (or Azure resources if you’re configuring PIM for Azure resources). Then, select Roles to view all available roles.
- Choose a Role
Click on the role you want to configure with the Conditional Access authentication context. I’m using Application Administrator, but you can choose any available role.
- Modify Role Settings
In the role’s settings pane, click Edit. Select Microsoft Entra Conditional Access authentication context option and select the Authentication Context configured on step 2.
- Save the Changes
Click Update to apply the changes to the role.
Make sure you have users eligible to PIM role assigment. If you don’t, you can configure selecting Add Assignments below:
Step 3: Verify the Configuration
- Test Role Activation
Sign in as a user who is eligible for the role. Try to activate the role to ensure that the Conditional Access authentication context is enforced. The user should be prompted to satisfy the authentication context (e.g., MFA) before the role is activated. During our test, we see conditional access policy requires additional verification because our test user didn’t sign in using passkeys:
The user is prompted to authenticate using either a FIDO2 key or a Passkey: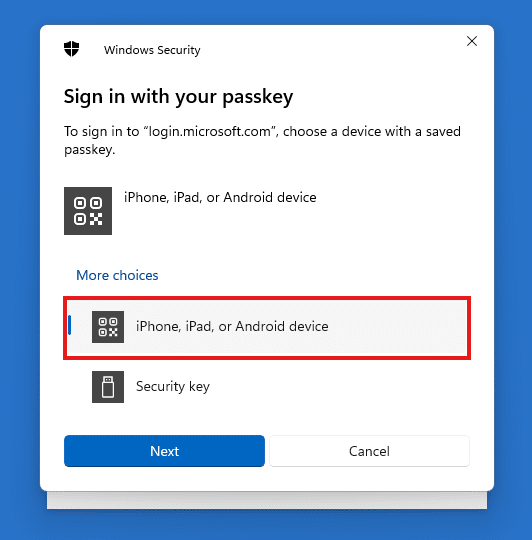
After completing the authentication using the passkey, the authentication is successful and the user is now able to activate the role using PIM:
- Monitor Logs and Alerts
After testing, review the Microsoft Entra sign-in logs and Conditional Access insights to confirm that the policy was applied as expected. This step is crucial for validating that your security configurations are working correctly.
With the sign in activities below, we confirm the policy PIM Role Activation Context has applied and the user has authenticated using a passkey:

Conclusion
Configuring Microsoft Entra PIM with Conditional Access authentication context and Conditional Access authentication strength features adds an extra layer of security to the role activation process, ensuring that sensitive actions are protected by rigorous authentication requirements. By following the steps outlined in this guide, you can effectively integrate these powerful security features into your organization’s identity management strategy.
Regularly review and update your Conditional Access policies and PIM settings to adapt to evolving security needs and ensure that your configurations remain aligned with best practices.
Did you find this article helpful? Consider showing your appreciation by liking and sharing it. 🙂
Disclaimer: The views expressed in this post are personal and do not represent the opinions of my organization. The provided solution is offered “AS IS” without warranties or guarantees and should be validated in a test environment before deployment in production.
Your suggestions and feedback are invaluable; feel free to leave a comment.
[ ]’s Ulysses Neves
